Showing posts with label bake. Show all posts

Friday, May 27, 2011

Zucchini Herb Casserole


I love zucchini and luckily so does my hubs.  I mostly love it grilled or in stir fries but I thought I would try it in a casserole.  I found this excellent recipe at my favorite site, AllRecipes.com and we absolutely LOVED it.  Luckily I made a double batch and were able to eat it the next day as well.  I made it as stated but used instant rice since I was in a hurry and was hungry. 

I love this recipe and will for sure make it again.  It is great as a complete vegetarian meal or if you add ham, sausage or something else, I bet it would be equally yummy.

If you were to make this recipe, it would excite you!  The colors are amazing!  I don't know why but a colorful dish always does it for me.

Monday, April 18, 2011

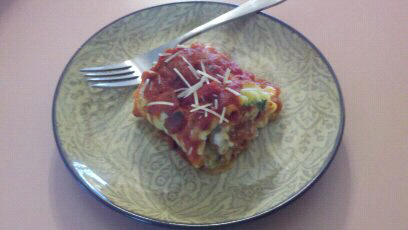
Lasagna Rollups


I love this recipe because I usually have all the ingredients on hand besides the ricotta so it's an economical, delicious dinner.  For some reason I find making lasagna in this fashion is much easier then the traditional way with layers.  I find that when I do the layers I never have enough ricotta to spread it out enough to cover the entire dish.  Also, this makes for better portion control as you cannot just cut off a bigger piece....you have to take a roll.

I am including a meatless version because I made this on a Friday during Lent.  I would usually add ground beef, ground turkey or some kind of sausage.  

I don't measure when I make this so I am giving approximations.  You really cannot screw it up.

Well here is what you need:
(12) lasagna noodles cooked according to pkg. directions
(1) jar of your favorite pasta sauce
(1) 30 oz container of Ricotta cheese
(1) cup of grated Parmesan Cheese
(1.5) cups of shredded Mozarella Cheese
(2) eggs
(1) tsp. of Italian seasoning
(1) tbs. of olive oil
(1/2) cup of diced onions
(1) tsp. of minced garlic
(1.5) cups of steamed broccoli, chopped
(2) cups of fresh mushrooms, diced

Preheat oven to 350.

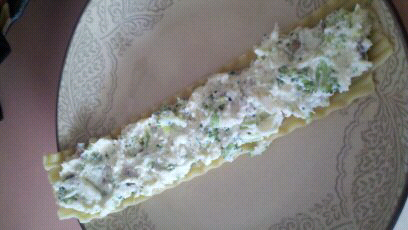
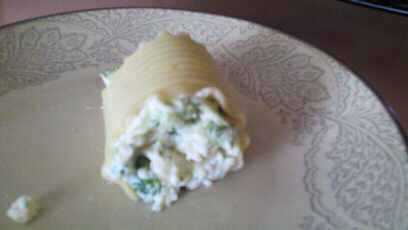
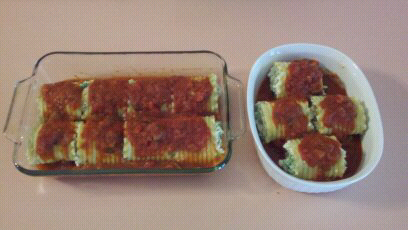
To begin, spread (1) cup of the pasta sauce in the bottom of a baking dish.  Then, mix the Ricotta, Parmesan and Mozarella cheeses in a mixing bowl along with the Italian seasoning and eggs.  Next, heat a pan and add the oil. Saute the garlic and onions.  Add the mushrooms and steamed broccoli and cook for a few minutes until the mushrooms are tender and the flavors are combined.  Add the contents of the pan to the cheese.mixture and stir.  Lay a cooked noodle flat and spread the mixture along one side.  Roll then noodle until you reach the end.  Place the rollup seam side down in the making dish.  Repeat until you run out of noodles.   Top each roll evenly with the remaining sauce.  Bake for 45 minutes. 

Voila!  You're done.  This is a great make ahead or freezer meal.

Try this out and let me know how you like it!

Here is the mixture spread on the noodle.
Here it is all rolled up.

Ready for baking.  I always make an extra smaller dish to give away. 
This time, my father in law, Ron and Faye, Clint's wonderful step-mom were the receivers.

Thursday, February 24, 2011

Judy's Strawberry Pretzel Salad


For the most part, when I plan a dessert I go one way or the other.  I either want it to have some kind of fresh fruit in it or have no healthy stuff in it at all.  In my mind, the first justifies all the sweet stuff that is also included.  Monday night I made this recipe.  I don't know why it is called a salad.  There is nothing salady  (is that a word)? about it.  Regardless, it was delicious and of course made with mostly items I had on hand.  I did make a few minor changes though.

The dessert is basically three layers; the crust, a cream cheese mixture and then jello/strawberry mixture.

Here are the ingredients I used for the crust as instructed

1.5 cups of crushed pretzels. 
4.5 tbs of white sugar
3/4 cup melted butter

You mix the pretzels and sugar in a bowl.  Pour the melted butter on top and stir.  Press the mixture to the bottom of a 9x13 pan.  I used glass.  Bake this at 350 for ten minutes...no more!  So many of the reviews for this recipe said to make sure you don't go over the ten minutes.  The crust may not look done, but it is.  Let it cool.

Rather than move on to the cream section, I changed the steps a bit since I was using fresh strawberries rather than frozen.  I washed the strawberries, sliced them and placed them in a bowl.  I sprinkled with a little sugar so some juice would be released. to make it more similar to the frozen version which contains juice.


 I moved on to the cream cheese section which I used the following ingredients.

(2) 8 oz blocks of cream cheese
(1) cup of sugar
(2) tbs of vanvilla extract
(1) 8 oz container of Cool Whip

The original recipe does not call for the vanilla....but I knew it would be better if I added it.  You blend the cream cheese, sugar and vanilla together til smooth.  Then, fold in the cool whip.  Spread this over the cooled crust making sure that none of the jello mixture you will be working on next can seep through to the crust which will make it soggy.  Lastly, refrigerate for about 30 minutes.

Cream Cheese, Sugar and Vanilla Extract.

Those three ingredients blended.
With the Cool Whip folded in.
Spread over the crust.
Next, for the final layer.  You need the following:
(1) 6 oz pkg. of Strawberry jello
(2) cups boiling water
sliced strawberries with juice from above

Dissolve the jello in the boiling water.  Add your strawberries.  I waited a bit before adding mine to the hot liquid.  I let it sit about 10 minutes or so before adding them.  I didn't want them to turn mushy.  After mixing, pour the mixture on top of the cream cheese layer.  Refrigerate for an hour or til set.  I did mine late at night, so it had the entire night to set. 


We had it the following night and it was delish!


This is one to try.  You can use the original recipe found here or use my version with fresh strawberries and the added vanilla.  Either way it is yum.  Also, if you're not a strawberry fan, I am sure it would be good with raspberry jello and raspberries as well.  Get creative.

Monday, February 14, 2011

Happy Valentine's Day!

Clint and I don't do much for Valentine's Day.  At most, we say "Happy Valentine's Day" if we remember.   We use to get eachother a card and a little something each year, but somehow silently agreed it was silly.  I think that it's a holiday that's cool when you're in high school and your boyfriend brings or has flowers or some other suprise delivered to you.  I suppose after you don't celebrate it for years and suddenly you actually do something, it makes it more exciting as well. 

That is what I decided to do this year.  This morning I decided to deliver a Valentine's Day themed lunch to my hubby at work with Jude.  By his reaction, I think he liked it a lot. I used my bento that I love so much to layer all the elements on top of one another.  I blogged about this wonderful bento here.

Here's what his lunch consisted of:

Layer one was a HUGE heart shaped brownie-freshly baked, a banana with "I am banana's for you" written on it and a salad underneath.  The salad had heart shaped cheese and tomatoes that spelled out "I love you".

Layer two had (2) Heart shaped sandwiches, fresh strawberries, a fruit crisp and his Raspberry Vinegarette salad dressing. 

Layer three was just (2) Valentine's Day cookies, his fave kind of cupcake (Carrot Cake with Cream Cheese frosting), and I cut and molded one of his Fiber One bars into a heart. 


 Cute, huh?  I think so...especially for deciding to do it the morning of.  What did you do for your someone special? 

Thursday, August 5, 2010

Yummy to my tummy Chicken Pot Pie!

I personally love chicken. I also love a dish that offers everything you need in one meal. Who doesn't like "all inclusive"? That's the reason I love Chicken Pot Pie. There is a lot of substitutions that can be made in any pot pie recipe based on preferences in protein or veggies. I have often substituted the veggies for what I have had on hand.

Anyways, here is my super duper pot pie recipe.


Here are the steps.

Chop one cup of carrots.Chop 1/2 cup celery.
Chop 1.5 lb. chopped chicken breast.
Add the carrots, celery, chicken and 1 cup of frozen broccoli to a saucepan. Add just enough water to cover. Boil for 15 minutes.Drain.Chop 1/3 cup of onions. I always add a bit more since Clint, Jude and myself like onions.
Saute onions with 1/3 cup butter.
In the meantime, get out your prepared pie crusts.
Lay the first one in a pie plate. Pour in the chicken mixture.
Add 1/3 cup flour, 1 tsp. salt, 1/2 tsp. black pepper and 1/2 tsp. of celery seed to the onion mixture.
Then add 1.5 cup of Chicken broth and 2/3 cup milk.
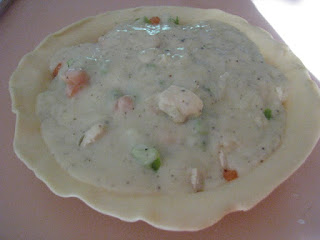
It gives you a gravy that looks like this.
Pour this gravy over the chicken mixture. Cover with the other pie crust and bake at 425 for 30 minutes!

Voila! Now you have a delicious meal!

Wednesday, July 21, 2010

A tasty treat!

I am fortunate in the fact that I married into a family who likes to garden. Although, I enjoy fresh from the garden produce, I never had the desire to grow my own. I have always just resorted to going to the Farmer's Market in Flint or Frankenmuth. Despite my lack of interest in preparing the soil, weeding, chasing away rabbits and deer and plucking vegetables from a garden in the sweltering summer sun, I have always planned on planting a garden with my kid(s) when they reached about 2 or 3 years old. I think it's a great lesson in Science and Agriculture which is very important when you live in the New Lothrop area which is such a rich farming community and has such a great history in Agriculture. As for now, I am very lucky to have in-laws who garden and share their fresh produce with us.

Last summer, I benefited greatly because right when all the zucchini, beets, carrots and squash were ready is when Jude started eating solids. I was given tons of fresh produce and turned it into baby food puree in my Magic Bullet for Jude. Not only was it a huge cost savings, but it was also reassuring that I knew what was going into what my baby consumed. In addition, I think starting on such a wide variety of fresh foods is what makes Jude such an adventurous eater. This child does not turn away anything! He is only under 16 months and already eats salads for heavens sake! (This makes me proud).

Anyways, yesterday when I picked Jude up from my mother in laws work (she owns a Greenhouse), she had a huge basket full of produce for me. I came home with seven types of peppers, two kinds of green beans, tomatoes and zucchini. I was thrilled to get zucchini because I just stumbled on a recipe over at Inside BruCrew Life I wanted to try. They are called Banana Chocolate Chip Zucchini Cookies and oh my were they to die for. They may be my new favorite cookie. If your child doesn't like veggies, this is a great way of tricking them into getting a few servings.
First, I creamed 3/4 cup of shortening.
Added two Eggs.
Grated two cups of zucchini. (look at the beatiful color-that's what you get when you use fresh ingredients).
I added 2 cups of sugar, 3 3/4 cups of flour, 1 tsp. of baking soda and 1 tsp.. of salt along with the grated zucchini to the shortening and egg mixture. I blended all these ingredients together to make a dough like consistentcy. I must note that the mixture is less dry than your normal chocolate chip cookie dough. (I think its from the liquid from the zucchini-but it didn't affect the way the cookies turned out).
I then stirred in two mashed bananas and a bag of semi-sweet chocolate chips. Just take a spoon and drop onto cookie sheet. Bake at 350 for 10-12 minutes.
The insructions say to cook on the cookie sheet and keep in an airtight container overnight becuase the flavor is much better the next day. We ignored the last part and took one straight from the cookie sheet and gave it a try! They were great! I can only imagine what they taste like today!

And here is the reward - delicious soft cookies!

Thursday, May 13, 2010

more of my continued update...

Hope you enjoyed the pics from my previous post. It really was a great first family vacation. I have a few food and cooking related items to post...so be expecting them! I will start with the first one below. I have been trying to add more to the variety of foods that I offer Jude since I usually pack one of three things for his breakfasts...so last night I made some delicious homemade Apple Muffins from a recipe I found at Allrecipes.com, my all time favorite recipe site! Here are the ingredients to make a dozen of delicious muffins!


(2) cup of flour
(3) tsp. baking powder
(1/2) tsp. salt
(1) tsp. cinnamon
(1/2) cup white sugar
(1/3) cup vegetable oil
(3/4) cup apple juice
(1) egg
(1) cup apples (peeled, cored and finely chopped)


This recipes starts with preheating the oven to 400 degrees and spraying or lining the muffin tins. I did half and half; sprayed (6) for myself and Clint to share and lined (6) in fun liners for Jude.


Next, gather your ingredients.

Here's what I used. (I used Fuji apples---bc I love the sweetness).


Next, you combine all the dry ingredients. (flour, sugar, baking powder, cinnamon and salt).

I added a little more cinnamon--since I love it and so does Jude.

Mix these ingredients well.


Then, in a seperate bowl combine the apple juice, oil and egg and mix.


You then add the dry mixture to the wet mixture all at once.

(I moved the wet ingredients to a larger mixing bowl so that I could do this step..I thought that I would have to add the wet to dry).

At this point, the mixture looks like creamy, beautiful peanut butter but smelled of cinnamon.


Next, you add the finely chopped cup of apples.


Now, after the addition of the apples, it looked like peanut butter still--but the chunky version.


Scoop the mixture into the tins til they are 2/3 full.


Now is the waiting process. Luckily it only takes 18-22 minutes to bake.

I always take the middle road, so I did 20 minutes.


If only you could smell these babies!

And they were just as yummy as they smell!


We all loved these. I gave Clint the idea to drizzle some warm applesauce on top...and he loved it!

Jude only left crumbs.