Friday, February 25, 2011

Blogs that Inspire Update

After looking at my blog, I realized that I needed to update my "blogs that inspire" tab.  I haven't edited it since I first began my blog and felt it was time.  I added a bunch and removed a few that I hadn't been actively looking at. 

I wanted to give some insight to a few of them in case you all wanted to start following as well.  Here is a little summary of a few of them that I absolutely love. 


1.
 
I love this blog.  I look t it almost on a daily basis.  I love it for a number of reasons.  First, the frequency of posts is amazing.  So consistent!  I envy this.  Next, it has introduced me to so many blogs that I now follow.  The writer of this particular blog, Lorie, basically features other projects and ideas from other blogs.  The variety she offers is amazing!  There are home decor ideas, party ideas, links to recipes, fashion, and even baby ideas.  This is one to check out.

Recently, she posted about these Fortune Cookie Baby Booties.


And what about this great idea.  I know I will pass by some old shutters at a garage sale this summer so I have this idea saved to my favorites.  I love the colors used in this room as well!


2.

If you like to throw a good party, this is the site for you.  Kara features parties she has planned and those that are chosen from the submissions she receives.  There are so many great ideas...some that I am going to borrow for parties I host for Clint, Jude and the new baby on the way.  Also, if any of my friends would start getting married or having babies....I have some great ideas from this site I would love to share with them!  If you are looking for a prticular theme, there is a categories section on the right.

I will for sure be throwing a football party with ideas taken from her feautured party some time in my future. I really like this table set up from the Football Birthday Party. 


For the adults, I like this Bloody Mary bar.  Clint's friends, Steve especially, loves Bloody Mary's.


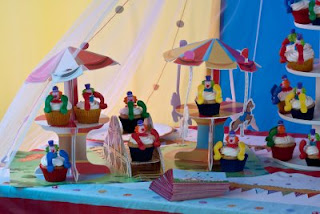
Also, there is not much I don't love about the Carnival Birthday Party.  That was actually going to be our theme for Jude's party this year, but I think it will be best to save it for when he is a little older...maybe next year or the following.  (When he is a little less afraid of clowns). 


And for a girl party, a Baking Party would be so fun!


Or how about this Owl Birthday Party!


3.  LoveK
This is a blog written by my very best friend, Kristen who lives all too far away in Everett, Washington.  (Oh, how I miss her always).  I especially love her blog because it keeps me updated on what she is up to in a different, non-traditional way.  It makes me feel closer to her.  She is uber creative and smart and always comes up with great ideas.  She gives a lot of how-to's on her blog which are so helpful.  She makes tasks that you may have thought too difficult seem easy. 

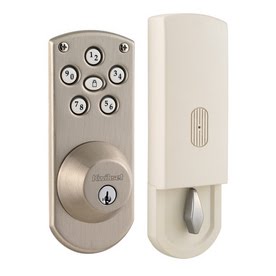
For example, her explanation of the install that took place of this push-button lock impressed me.

And this transformation made me want to do this over my sink as well because I despise what is currently there.


Well here are three of the fourteen blogs I have listed on my page.  I absolutely love these ones as well as the other ones...but only have so much time to tell you all about them in detail.  Maybe later this week I will give a breif description of some of the other ones!

Thursday, February 24, 2011

Judy's Strawberry Pretzel Salad


For the most part, when I plan a dessert I go one way or the other.  I either want it to have some kind of fresh fruit in it or have no healthy stuff in it at all.  In my mind, the first justifies all the sweet stuff that is also included.  Monday night I made this recipe.  I don't know why it is called a salad.  There is nothing salady  (is that a word)? about it.  Regardless, it was delicious and of course made with mostly items I had on hand.  I did make a few minor changes though.

The dessert is basically three layers; the crust, a cream cheese mixture and then jello/strawberry mixture.

Here are the ingredients I used for the crust as instructed

1.5 cups of crushed pretzels. 
4.5 tbs of white sugar
3/4 cup melted butter

You mix the pretzels and sugar in a bowl.  Pour the melted butter on top and stir.  Press the mixture to the bottom of a 9x13 pan.  I used glass.  Bake this at 350 for ten minutes...no more!  So many of the reviews for this recipe said to make sure you don't go over the ten minutes.  The crust may not look done, but it is.  Let it cool.

Rather than move on to the cream section, I changed the steps a bit since I was using fresh strawberries rather than frozen.  I washed the strawberries, sliced them and placed them in a bowl.  I sprinkled with a little sugar so some juice would be released. to make it more similar to the frozen version which contains juice.


 I moved on to the cream cheese section which I used the following ingredients.

(2) 8 oz blocks of cream cheese
(1) cup of sugar
(2) tbs of vanvilla extract
(1) 8 oz container of Cool Whip

The original recipe does not call for the vanilla....but I knew it would be better if I added it.  You blend the cream cheese, sugar and vanilla together til smooth.  Then, fold in the cool whip.  Spread this over the cooled crust making sure that none of the jello mixture you will be working on next can seep through to the crust which will make it soggy.  Lastly, refrigerate for about 30 minutes.

Cream Cheese, Sugar and Vanilla Extract.

Those three ingredients blended.
With the Cool Whip folded in.
Spread over the crust.
Next, for the final layer.  You need the following:
(1) 6 oz pkg. of Strawberry jello
(2) cups boiling water
sliced strawberries with juice from above

Dissolve the jello in the boiling water.  Add your strawberries.  I waited a bit before adding mine to the hot liquid.  I let it sit about 10 minutes or so before adding them.  I didn't want them to turn mushy.  After mixing, pour the mixture on top of the cream cheese layer.  Refrigerate for an hour or til set.  I did mine late at night, so it had the entire night to set. 


We had it the following night and it was delish!


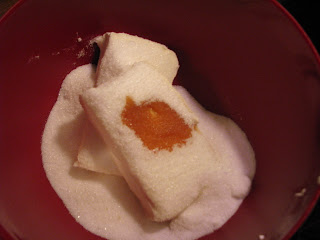
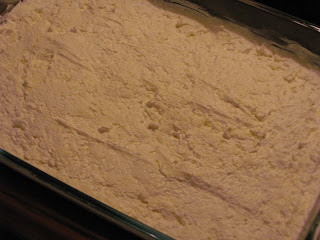
This is one to try.  You can use the original recipe found here or use my version with fresh strawberries and the added vanilla.  Either way it is yum.  Also, if you're not a strawberry fan, I am sure it would be good with raspberry jello and raspberries as well.  Get creative.

Fool proof menu planning.

I have a method that I use for menu planning in our house.  I have a notebook which contains a menu for six days on each page.  I have about 12-15 pages. That is about 75-90 main recipes total.  Each page has a variety of meals.  For each week there is usually a meal with the main entree of beef, pasta, pork, fish, vegertarian and chicken paired witha grain and veggie.  If all of these aren't covered than whatever is missing is usually replaced by having chicken additional days.  (My fave protein)!  I just rotate in no particular order through these recipes.  I have listed where the recipe are located under the title so I know where I can find them easily.  If there is no location, then it's my own personal recipe that I know from memory.  Also, I have a dessert listed every two days.  So we will have the same dessert two days in a row or if there is no dessert it is replaced with fresh fruit.

I must mention that each week there is a "REALLY" simple, casual recipe on one of the days.  For example, this week it is Pesto Chicken Panini's on focaccia bread.  I am pairing it with homemade baked potato soup.  The paninis are easy peasy.  Simply stacking the ingredients on the bread and cooking long enough on the George Foreman grill to melt the cheese and heat thoroughly.  Also, this week I am making this Cherry Chicken Salad.  I am taking the easy way out and just buying a rotisserie chicken to make both of the recipes.  Cuts down on time spent actually cooking.  All I have to do is chop some veggies and mix with the remaining ingredients on both days!  How clever?

A great thing about this system is that you have a list of what you are making for an entire week right in front of you.  You can look at the weekly grocery sales ads and choose a weeks worth of meals from your notebook and choose based on what is on sale that week.  Genius!  It cuts costs and lets you plan in advance.  I find that this system saves me so much thinking.  I am making my grocery list much earlier and sticking to it because I really do not need anything more than what is on it to feed the family for an entire week.  Most of the recipes I use include pantry items that I already have on hand, so I just need to get the proteins and veggies I need.  The only items I tend to buy not on my list are household items or the things Clint needs on a weekly basis which consists of a gallon of chocolate milk and white milk, tons of protein bars, a loaf of bread, peanut butter with omega-3's, a bunch of bananas, a dozen eggs that he boils, Gatorade and Ensure protein drinks.  This is literally the list of items he takes to work with him every week!  He is so healthy and disciplined.  I am so lucky to reap the rewards of it...he's so smoking hot. 

Back to the subject of menu planning.....

You are probably wondering why I don't have seven days listed on each page rather than six.  I only do six because there are usually left overs from one of the days or we are simply not home or go out to eat. 

I am wondering if anyone else has a method for menu planning different than what I described above?  If so, I would love to hear it. 

Thursday, February 17, 2011

Things I want to make/do

So there are a few ideas that I have been gathering of things that I want to make in the near future.  Most of it includes sewing since I have to stay away from my beloved spray paints while pregnant.  Oh how I miss them!  I miss them on a day like today especially when it's getting nice out and there is no wind.  The spray paint calls to me but I must refrain.  I am sure that within a week of the baby's birth, I will be back at it in full swing!

In the meantime, here are some things I am looking to create.

1.  Mr and Mrs Burlap Pillows with insert by Ballard Designs.
These beauties retail for $59.00 each!  Can we say INSANE?  These would cost $10 at most to make both of them.  I cannot wait to pick up some burlap on my next trip to JoAnn's and make them.  Not sure if I will use the Mr and Mrs idea or put some other genius words on them.  I love the earthy feeling of them.

2.  Utensil Holders done by Crafts by Amanda - found this idea via Be Different Act Normal (a blog I <3).
I like this idea for one reason-I have a lot of utensils.  I have tried to downsize or get rid of some of them many times and have a hard time doing so.  I can honestly say-I use them all!  I cook a lot, so I use them frequently as well.  As of right now I have a stainless steel utensil holder that has my go to necessities, but then I have a drawer of others that I use less often and then another space for all my serving pieces, and another space for the grilling utensils.  It's not that they are all unorganized and a mess...its just that they are all in different organized spaces.  If I had seperate holders for each, I could keep them together - but separate in a wonderful way.  I am not sure when I make mine if they will necessarily be in the same type of plastic containers...but I just like the concept used here.


I want to better utilize my storage space in the kitchen.  I am constantly improving this problem by moving things over and over again, finding better storage tools that are sold or by changing the way I buy items.  I want to free up some space before the new baby arrives since where Jude's bottles use to be, there are now sippy cups, cups, kids plates/bowls, etc.  Now we will need space for both.  I thought that if I bought two of these it would free up two drawers in our kitchen.  I would install them on the cabinet under the sink and use one for the wraps and storage bags and the other for the phone book that is in the other drawer.

I have been saying for awhile that I need a car organizer of sorts.  My vehicle has always been my downfall.  I keep everything else in my life neat and orgaized....everything has its place.  My car on the other hand is a different story.  It's a disaster.  Unfortunately for me, Jude doesn't care about the cleanliness of my car either.  I found this tutorial and I think that I may use this exact one or find something similar.  I will likely make one for each of my seat backs; one for Jude and one for the new baby when she makes her appearance.

carorganizers1.JPG


I have been searching for a gender neutral shower curtain so I can redo the guest (kids) bathroom.  Right now-it is decorated for adults.  I don't necessarily want it to be too kiddish, but more kiddish than it is now.  That means that it needs a paint job, a new curtain, new rugs and kid friendlier wall art.  Also, I would like to remove the existing towel bar and replace it with a hook for each child at a kid friendly height.  I would like to put an additonal hook above to hang a slouchy basket or a galvanized bucket with their names on it above to hold their lotions, washcloths, and such other things.  I thought that this tutorial from DesignSponge was great for including things that would fit both genders.


Monday, February 14, 2011

Another Chicken Recipe.

If you haven't noticed yet, we eat a lot of chicken in our home.  It's most likely because I am the cook and it's my fave protein, so I have the final say.  Isn't that wonderful?

Well here is a go to recipe that our family loves.  It's so simple and easy and requires so few ingredients, it is genius. 

I have no pictures to post because when we had this for dinner last week with mashed potatoes and gravy with corn--we devoured it all too quickly to snap even one photo. 

All you need is (3) chicken breast, flattened, half of a brick of cream cheee, softened, (2) tbs. of finely chopped onion and (3) green onions, chopped.  You may sprinkle with a little bit of seasoned salt if desired.

Preheat the oven to 350.  Mix the cream cheese, onions and green onions in a bowl.  Place equal amounts of the mixture in the center of the chicken breasts.  Wrap the chicken around the cheese mixture and place in baking pan with seam down.  Sprinkle with seasoned salt.  Bake for 45 minutes.

This turns out so yummy and delicious.  It is so economical to make as well.  Really, it's maybe about $4-$5 to serve three people!  Yould never would never know it because it looks so fancy on the plate.

If you are craving a little more punch, I have in the past chopped leftover bacon and added it to the mixture.  If I just have defrosted bacon, I wrap the chicken as the last step with a strip of bacon before baking.  Yummy to my tummy!

As a side note--this is a recipe that I have made in a batch and frozen as well.  I follow all the same steps but when it comes time to bake, I place the chicken in a freezer bag and freeze for upto 2 months.  You can secure the chicken shut with a toothpick or wrap in plastic wrap if desired.

Happy Valentine's Day!

Clint and I don't do much for Valentine's Day.  At most, we say "Happy Valentine's Day" if we remember.   We use to get eachother a card and a little something each year, but somehow silently agreed it was silly.  I think that it's a holiday that's cool when you're in high school and your boyfriend brings or has flowers or some other suprise delivered to you.  I suppose after you don't celebrate it for years and suddenly you actually do something, it makes it more exciting as well. 

That is what I decided to do this year.  This morning I decided to deliver a Valentine's Day themed lunch to my hubby at work with Jude.  By his reaction, I think he liked it a lot. I used my bento that I love so much to layer all the elements on top of one another.  I blogged about this wonderful bento here.

Here's what his lunch consisted of:

Layer one was a HUGE heart shaped brownie-freshly baked, a banana with "I am banana's for you" written on it and a salad underneath.  The salad had heart shaped cheese and tomatoes that spelled out "I love you".

Layer two had (2) Heart shaped sandwiches, fresh strawberries, a fruit crisp and his Raspberry Vinegarette salad dressing. 

Layer three was just (2) Valentine's Day cookies, his fave kind of cupcake (Carrot Cake with Cream Cheese frosting), and I cut and molded one of his Fiber One bars into a heart. 


 Cute, huh?  I think so...especially for deciding to do it the morning of.  What did you do for your someone special? 

Friday, February 4, 2011

Yummy Italian

Here is another go to recipe for all of you looking for an easy quick meal. 

It is really so easy and the way that it is set up makes the prep and clean up easy peasy.  This recipe is for (4) servings so make adjustments accordingly.  I almost always make my meals to serve 4-6 even though there is only three of us.  Clint loves leftovers for lunch the next day and Jude is the same so it saves me a prep for the following day.  On this day, I only made enough for three since I knew Clint was going to have a snow day the following day.  (Yay)!

Let's get started.

Ingredients:
(1) tbs. of oil
(4) chicken breasts
(2) eggs
(2) cups of bread crumbs (I use Italian flavored)
(1/2) cup of parmesan cheese
(1) jar or your fave spaghetti sauce
(1) ball of fresh mozarella cheese, sliced
(1) Angel hair pasta (or your favorite kind)

Preheat the oven to 350 degrees.

Start out by beating the eggs in a shallow bowl.  Mix the bread crumbs and parmesan cheese in another shallow bowl or plate.  Heat a the oil in a pan over medium high heat.  Dip the chicken breast in the eggs and then coat with the bread crumb/parmesan cheese mixture.  Place the chicken in the pan and brown for approximately 4-5 minutes on each side depending on the thickness of your chicken. 

While your chicken is cooking, pour the pasta sauce in a 9 x 13 baking pan.  Once the chicken is complete place on top of the sauce.  Then top with a slice of the mozarella cheese.  Bake for 20-25 minutes. 

In the meantime, cook your pasta.  Once the chicken is complete, plate your pasta and top with sauce and a piece of delicious chicken covered in yummy melted mozarella.

A couple of hints:
-If you don't have Italian bread crumbs, use regular and stir in some Italian seasoning.
-If you don't want to get a ball of cheese, you can use shredded mozarella.
-Wash your prep dishes while your chicken is in the oven and your pasta is cooking.  That way after dinner you are not overwhelmed.
-I make a salad with the left over mozarella.  I slice the remaining and pair it will sliced roma tomatoes and chopped fresh basil.  I drizzle with Italian dressing!  YUM!
-Here is my biggest pasta prep secret.  Are you ready?  I PRE-prepar pasta in advance.  I boil a huge pot of water, cook the pasta, drain the pasta and let it cool.  Once cooled I seperate the appropritate serving size for our family in freezer bags and freeze.  You can either refrigerate for three days or freeze for three months..  On the day that I know I am cooking pasta, I take it out in the morning and let it defrost and just put it in a colander and run it under hot water when I am ready for it.  I cannot tell you what a time saver this is.  Also, less dishes on eating day!  Can't beat that.  Plus, I, nor Clint are able to tell the difference,

This is what I mean by a "ball" of fresh mozarella. 

Here is the chicken all golden brown and place on top of the pasta sauce.

Here is the pasta topped with sliced cheese prior to baking.

We love love love this recipe!